Make Perfect Starbucks Cake Pops Recipe at Home
Ever wondered how to make Starbucks cake pops at home? I did, and it changed everything. The first bite was like a dream come true. Now, you can make these treats in your kitchen too!
Making Starbucks cake pops is more than just following a recipe. It’s about combining baking, creativity, and passion. This guide will help you, no matter if you’re a pro or a beginner, to make these treats at home.
You’ll learn how to pick the best ingredients and coat them in chocolate. Soon, you’ll be making cake pops that look and taste just like Starbucks.
Table of Contents
Why Starbucks Cake Pops Are So Popular
Cake pops have changed the dessert world, and Starbucks led the way. These small treats have won over dessert fans everywhere. They’ve changed how we enjoy sweet treats.
Starbucks started making cake pops to use up leftover cake. This clever idea quickly became a hit in coffee shops and homes.
The Rise of Cake Pops in Coffee Culture
Starbucks cake pops recipe changed the dessert scene. Their success comes from several reasons:
- Portable and convenient size
- Wide variety of flavors
- Instagram-worthy appearance
- Perfect portion control
What Makes These Treats Truly Special
Starbucks cake pops stand out because of their special qualities:
| Feature | Description |
|---|---|
| Texture | Moist, dense cake inside with smooth chocolate outside |
| Flavor Variety | From classic vanilla to seasonal treats |
| Visual Appeal | Colorful decorations and precise design |
“Cake pops are not just a dessert, they’re a miniature work of art you can eat!” – Pastry Chef
These bite-sized treats are more than just a dessert. They’re a cultural hit that mixes creativity, convenience, and taste in one.
Essential Ingredients for Starbucks Cake Pops Recipe
To make tasty chocolate-coated cake balls at home, start by gathering the right ingredients. The secret to these no-bake treats is using top-quality parts. This ensures they taste like they came from Starbucks.
Here’s what you’ll need for your cake pops:
- One boxed cake mix (vanilla or chocolate)
- Frosting (store-bought or homemade)
- Candy melts or chocolate coating
- Lollipop sticks
- Sprinkles or decorative toppings
Choosing the right ingredients is key. Cake mixes give a solid base. Frosting holds the cake balls together.
| Ingredient | Purpose | Recommended Quantity |
|---|---|---|
| Cake Mix | Base for cake pops | 1 box (15.25 oz) |
| Frosting | Binding agent | 1/2 to 3/4 cup |
| Chocolate Coating | Outer layer | 2 cups melted candy melts |
If you follow a special diet, you can use gluten-free cake mixes or vegan chocolate coatings. This way, you can make your Starbucks cake pops recipe your own. The aim is to create delicious chocolate-coated cake balls that taste just like the real thing.
Pro tip: Always use room temperature ingredients. This helps with smooth mixing and a consistent texture in your no-bake treats.
Required Tools and Equipment
Making cake pops is fun with the right tools. Whether for birthday snacks or kids’ parties, the right gear makes it easy and enjoyable.
Creating cake pops needs specific tools. These help you make treats that look like they came from a bakery. Let’s look at the essential tools you’ll need.
Basic Kitchen Tools You Already Own
Most bakers already have these basics:
- Large mixing bowls
- Electric mixer or whisk
- Rubber spatula
- Baking pan
- Cooling rack
Specialized Cake Pop Equipment
For better cake pops, get these tools:
- Cake pop mold for uniform size
- Cake pop sticks
- Styrofoam block for drying
- Digital kitchen scale for exact measurements
Decorating Supplies for Stunning Cake Pops
Make your snacks pop with these decorations:
- Melting chocolate in different colors
- Sprinkles and edible glitter
- Piping bags
- Small offset spatula
- Decorative candy melts
With these tools, you’re set to make amazing cake pops. They’re perfect for any party or celebration.
Preparing the Perfect Cake Base

Making the perfect cake base is key for starbucks copycat recipes. The cake base affects the texture and taste of these desserts. Choose a moist cake that will stick together well.
Here are the important steps for preparing your cake base:
- Choose a dense, rich cake variety like vanilla or chocolate
- Ensure the cake is completely cooled before crumbling
- Crumble the cake into fine, even pieces
- Use room temperature frosting for binding
The secret to great cake pops is getting the right mix. Too dry, and they crumble; too wet, and they fall apart. Mix cake crumbs with frosting slowly, checking the mix as you go. You want a dough that can be shaped into balls.
Experts say to use about 3/4 cup of frosting for each cake mix. This mix makes cake pops that are just right—compact yet tender. It’s the style that dessert fans love.
Pro tip: Refrigerate your cake base for 15-20 minutes before shaping to make handling easier.
How to Make the Cake Pop Mixture
Making the perfect starbucks cake pops recipe begins with the cake pop mixture. This step turns your baked cake into tasty no-bake treats. The goal is to get a mix that lets your chocolate-coated cake balls stick together well.
Creating your cake pop mixture needs careful attention. Begin by crumbling a cooled cake into fine crumbs. The texture should be like soft breadcrumbs, without big chunks.
Achieving the Right Consistency
To make the ideal cake pop mixture, follow these steps:
- Crumble the cake into a large mixing bowl
- Add frosting gradually, starting with 1/4 cup
- Mix using clean hands or a spatula
- Test the consistency by forming a small ball
The perfect mix should stick together without being too wet or too dry. When you squeeze it, it should hold its shape well.
Troubleshooting Common Mixing Problems
Having trouble with your cake pop mixture? Here are quick fixes:
- If too dry: Add more frosting, one teaspoon at a time
- If too wet: Mix in additional cake crumbs
- Always mix thoroughly to ensure even moisture
Professional bakers say the secret to great chocolate-coated cake balls is the right mix. Take your time and be precise – it makes all the difference!
Shaping and Chilling Your Cake Balls
Making cake balls the right way is key to creating tasty treats. These small delights need careful attention to get the perfect shape. This is important for any kids’ party food.

First, set up a clean area with the right tools. A cookie scoop is best for making balls that look great. Try to make them 1-1.5 inches big. This size is easy to handle and fun to eat.
- Use a cookie scoop for consistent sizing
- Roll cake mixture gently between palms
- Avoid compressing the mixture too tightly
- Keep hands slightly damp to prevent sticking
Chilling is a big help in making cake pops. Put the cake balls on a baking sheet covered with parchment paper. Chill them in the fridge for at least 2 hours. This makes them firm and keeps their shape when you coat them.
| Chilling Time | Purpose | Result |
|---|---|---|
| 1-2 hours | Initial firming | Partial stability |
| 2-4 hours | Complete setting | Ideal coating surface |
| Overnight | Maximum firmness | Perfect cake pop structure |
For party planners, try different shapes for fun. Make heart-shaped balls for Valentine’s or round ones for birthdays. Just remember to keep the size the same and the mixture cold.
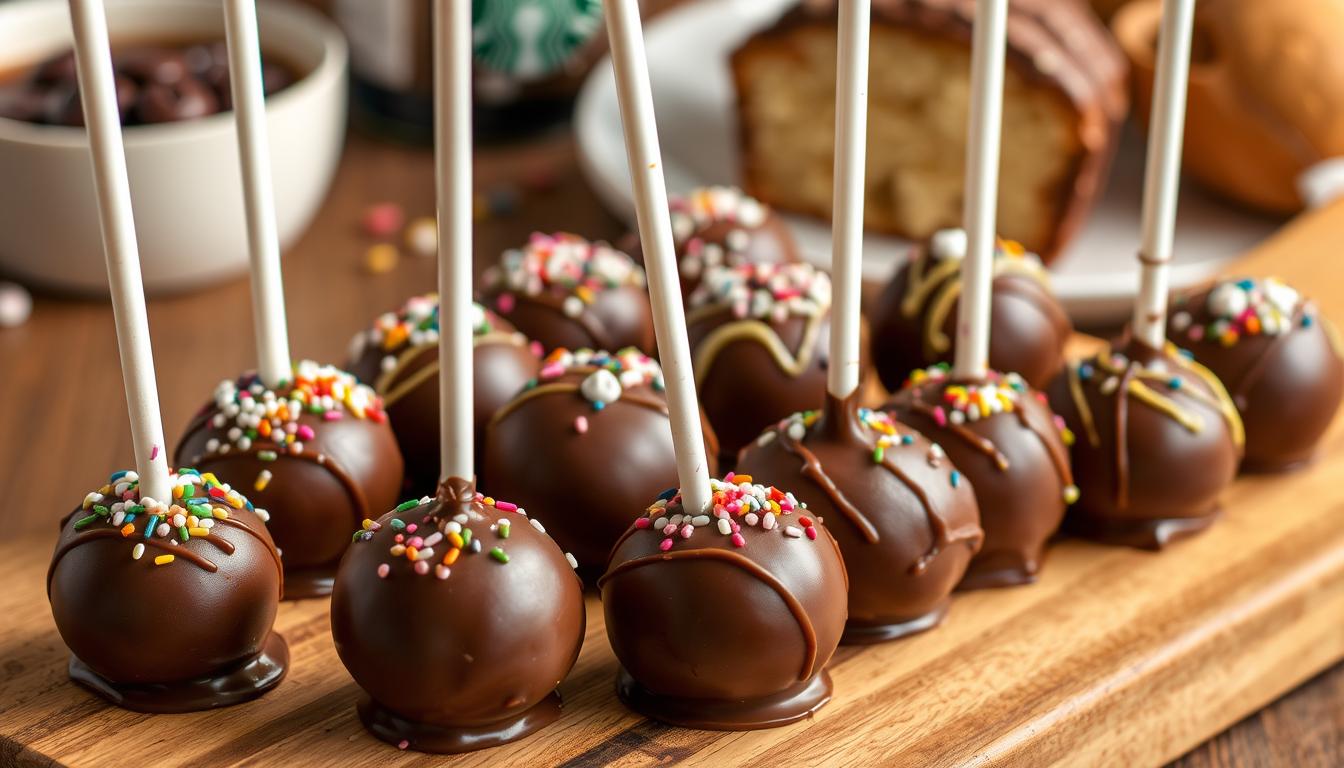
Mastering the Chocolate Coating Technique
Creating perfect chocolate-coated cake balls is an art. It can make your Starbucks copycat recipes stand out. The right coating gives them a shine and a professional look. You can make salon-quality cake pops at home with the right techniques.
To make your cake pops look like they came from a pro, choose the right chocolate and use precise dipping methods. Here are the key strategies for flawless chocolate-covered cake pops.
Choosing the Right Chocolate
Picking the perfect chocolate is key for success. Here are some top choices:
- Candy melts for smooth, vibrant coatings
- High-quality chocolate wafers with 60-70% cocoa content
- White chocolate for elegant designs
- Colored candy melts for creative decorations
Perfect Dipping Methods
Dipping cake pops needs patience and technique. Follow these tips:
- Ensure cake balls are thoroughly chilled
- Melt chocolate at low temperatures
- Use a deep, narrow container for dipping
- Tap off excess chocolate gently
Professional bakers say to keep chocolate between 85-90°F for the smoothest coating. Stir it often to avoid clumps and get a glossy finish.
| Chocolate Type | Melting Temperature | Best For |
|---|---|---|
| Candy Melts | 85-90°F | Bright Colors, Smooth Coating |
| Dark Chocolate | 86-90°F | Rich Flavor, Professional Look |
| White Chocolate | 82-84°F | Delicate Decorations |
Mastering these chocolate coating techniques will make your cake pops look amazing. Remember, practice makes perfect. Don’t worry if your first tries aren’t perfect.
Creative Decorating Ideas and Variations
Turn your homemade cake pops into stunning Starbucks treats with creative decorating. Try vibrant sprinkles, metallic drizzles, and elegant patterns. These will make your treats pop at any party.
For kids’ parties, use themed decorations that fit the celebration. Use colored candy melts for character designs or rainbow patterns. White chocolate drizzles and themed sprinkles make simple cake pops magical.
Try different cake bases and frostings for flavor variations. Mix chocolate cake with peanut butter frosting or vanilla with raspberry filling. Each mix offers a new twist on the classic cake pop.
Practice makes perfect. Start with simple designs and get better with time. Don’t be afraid to try new things. Your cake pops will be a hit, showing off your creativity and baking skills.
FAQ
How long do homemade cake pops stay fresh?
Homemade cake pops last 3-4 days at room temperature in an airtight container. Refrigeration can extend their life to a week. Keep them covered and away from sunlight or heat for the best taste.
Can I make cake pops without a cake pop maker?
Yes, you can make cake pops without special equipment. Crumble a cake, mix it with frosting, shape into balls, chill, and coat in chocolate. It’s a simple, traditional method.
Are cake pops difficult to make for beginners?
Cake pops are easy once you get the hang of it. The key is the right mix of cake and frosting. With practice, even beginners can make them look professional.
What are the best chocolate coatings for cake pops?
Candy melts and chocolate wafers are top choices for coating. Milk, white, and dark chocolate work well. Use high-quality chocolate that melts smoothly and hardens fast.
How can I prevent cake pops from falling off the stick?
To keep cake pops on the stick, make sure the mix isn’t too wet. Chill the balls before adding sticks. Dip the stick tip in chocolate for a strong bond.
Can I make cake pops ahead of time?
Yes, cake pops are great for making ahead. Make the cake balls and refrigerate them for a day or two. Once coated, they stay fresh for 3-4 days in an airtight container.
Are there gluten-free options for cake pops?
Yes, you can make gluten-free cake pops. Use gluten-free cake mix or flour and ensure frosting and chocolate are gluten-free. Many brands offer gluten-free options.
How do I get a smooth chocolate coating on my cake pops?
For a smooth coating, melt chocolate to 90°F. Dip the pop straight down, then tap off excess. Rotate the stick for an even coat.
What are some popular cake pop flavor combinations?
Favorites include vanilla with chocolate, red velvet with cream cheese, and chocolate with vanilla. Try seasonal flavors like pumpkin or peppermint for fun.
How many cake pops does a standard recipe make?
A standard recipe makes 40-48 cake pops, depending on size. They’re perfect for parties or sharing with loved ones.
Did You Try Our Recipe?
There are no reviews yet. Be the first one to write one.