How to Make the Best Banana Split Cake in 2025
Every family has a special dessert that makes moments magical. For me, the banana split cake is that treat. It brings smiles and connects us all. This banana dessert is more than a recipe; it’s a journey of flavors and memories.
Looking for a sweet treat for a summer party, birthday, or just because? The banana split cake is perfect. It’s a twist on the classic ice cream parlor favorite, made into a stunning cake. It will wow your friends and family.
Creating a banana split cake might seem hard, but with the right help, you’ll be a pro in no time. This guide will show you how to make this amazing banana dessert. You’ll learn about ingredients and how to put it all together.
Table of Contents
Understanding the Classic Banana Split Cake
The banana split dessert has a rich history. It started as a simple ice cream treat and became a sundae cake. This cake brings the classic banana split to life in a new way.
Explore the banana split dessert’s journey. It went from a traditional ice cream treat to a modern cake. Its story is as layered and complex as the dessert itself.
Origins of the Banana Split Dessert
The banana split was born in the early 1900s. It was created by ice cream vendors who wanted to impress customers. The original had:
- A split banana as the base
- Multiple ice cream flavors
- Decadent toppings like chocolate sauce
- Whipped cream and cherries
Traditional vs Modern Variations
Today’s sundae cakes take the classic banana split to new heights. They add layers and creative twists to the original. Bakers make these cakes to honor the past while introducing new flavors.
| Traditional Elements | Modern Cake Adaptations |
|---|---|
| Vanilla Ice Cream | Layered Vanilla Sponge Cake |
| Chocolate Sauce | Chocolate Ganache Layers |
| Fresh Bananas | Banana-Infused Cream Filling |
Key Components and Flavors
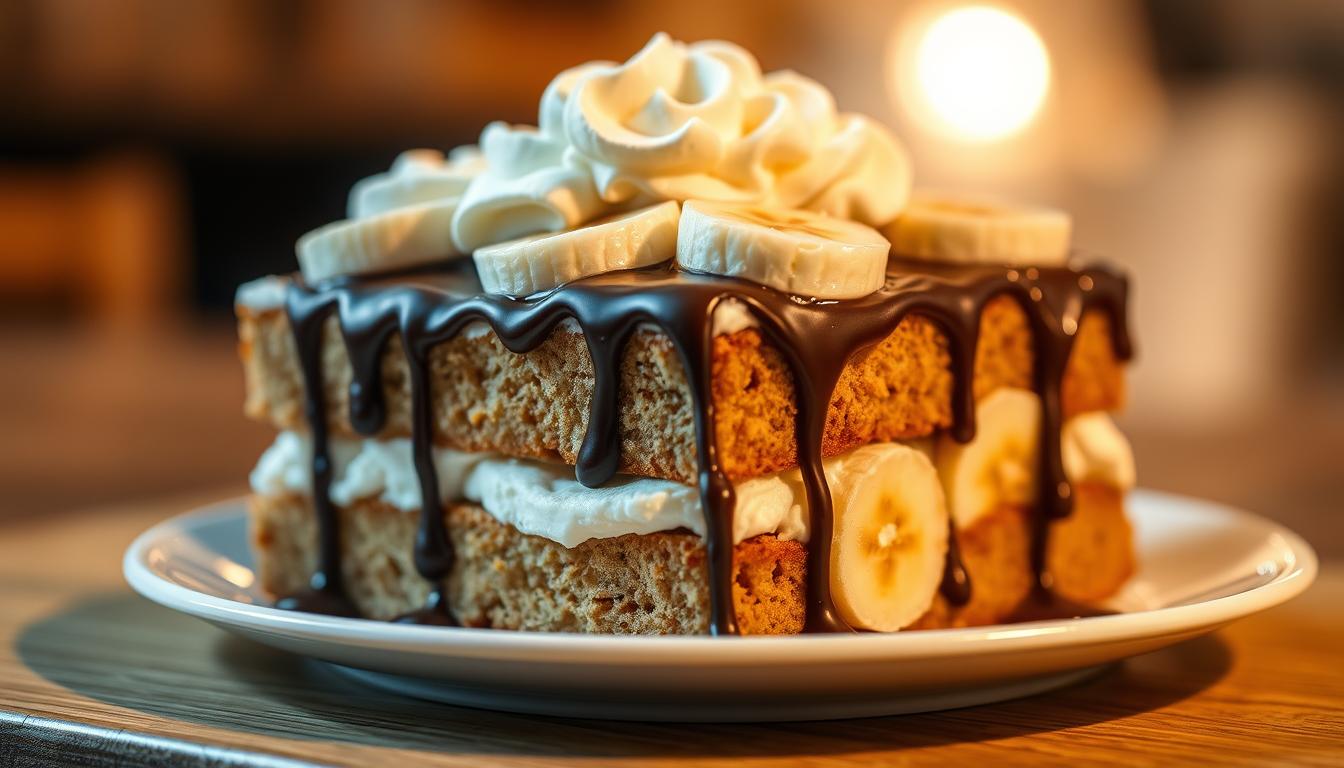
A banana split cake must have the right mix of flavors. It needs fresh bananas, rich cream, chocolate, and a light cake. Each bite should feel like a trip to the ice cream parlor.
Whether you love desserts or are new to baking, making a banana split cake is fun. It lets you dive into a piece of culinary history in a modern way.
Essential Ingredients for Your Banana Split Cake
Making a tasty banana split cake needs the right ingredients. Your no-bake banana split recipe will be a hit with the perfect mix. It turns a simple dessert into a special treat.
To make the best banana split cake, you’ll need a few key ingredients:
Cake Base Ingredients
- Graham cracker crumbs
- Unsalted butter
- Granulated sugar
- Cream cheese
Fruit and Filling Components
- Ripe bananas
- Crushed pineapple
- Maraschino cherries
- Whipped cream
Your banana split no-bake recipe needs fresh ingredients. Quality matters when picking fruits and dairy. Choose bananas that are ripe but not too soft. This ensures your cake tastes great and has a smooth texture.
Optional Flavor Enhancers
- Vanilla extract
- Chocolate sauce
- Chopped nuts
- Strawberry syrup
Professional bakers know that the right ingredients make a big difference. By using top-notch ingredients, you’ll make a banana split cake that everyone will love.
Kitchen Tools and Equipment Needed
Making a perfect frozen treat like a no-bake cake needs the right tools. Whether you’re new to baking or experienced, the right equipment makes the process fun and easy.
To start making a tasty banana split cake, you need the right tools. These tools will help you make this dessert easily.
Baking Essentials
For your no-bake cake journey, you’ll need some key kitchen tools:
- 9×13 inch baking pan
- Electric mixer or stand mixer
- Mixing bowls in various sizes
- Measuring cups and spoons
- Rubber spatula
- Whisk
Optional Decorating Tools
Make your frozen treat even better with these optional tools:
- Piping bags
- Decorative cake tips
- Offset spatula
- Rotating cake stand
Storage Containers
Storing your banana split cake right is key to keeping it fresh. Here are some good storage options:
| Container Type | Best For | Storage Duration |
|---|---|---|
| Airtight Plastic Container | Refrigerated Cakes | 3-4 days |
| Freezer-Safe Dish with Lid | Frozen Desserts | Up to 2 weeks |
| Glass Cake Carrier | Serving and Transportation | Day of preparation |
Pro tip: Always cover your no-bake cake to prevent moisture loss and protect it from absorbing other refrigerator odors.
With these tools and containers, you’re ready to make a beautiful banana split cake. It will be delicious and look great too.
Preparing the Perfect Cake Base
Creating the foundation for your summer dessert is key when making banana split desserts. The cake base is the start of a delicious and memorable treat. It will impress your guests. You can choose a traditional baked cake or a simple graham cracker crust. The right base can make your dessert even better.
Start by picking the right ingredients for your cake base. Here are some important things to consider:
- Choose a cake that goes well with banana split flavors
- Make sure the base is strong enough to hold multiple layers
- Think about the texture and moisture levels
For a classic summer dessert, consider these cake base options:
| Base Type | Flavor Profile | Difficulty Level |
|---|---|---|
| Graham Cracker Crust | Sweet and Crunchy | Easy |
| Vanilla Sponge Cake | Light and Neutral | Moderate |
| Chocolate Cake Base | Rich and Decadent | Intermediate |
When making your cake base, focus on moisture and consistency. A slightly dense cake is best for banana split desserts. It can hold multiple layers and toppings without getting soggy. You want a base that’s firm but also soft to match the creamy fillings.
Pro tip: Let your cake base cool completely before adding fillings or toppings. This stops moisture buildup and keeps your dessert perfect.
Creating the Banana Split Filling
Making a banana split cake is all about the filling. It’s where the cake comes alive, mixing flavors and textures that excite your taste buds.
Your filling should mix creamy and fruity elements for a memorable dessert. It’s all about balancing flavors and keeping it smooth and luxurious.
Fruit Layer Preparation
Choosing the right bananas is key for your banana split cake. Look for ripe but firm bananas that won’t fall apart. Here’s how to prepare your fruit layer:
- Choose bananas with minimal brown spots
- Slice bananas evenly, about 1/4 inch thick
- Brush banana slices with a light lemon juice coating to prevent browning
- Arrange slices in a single, overlapping layer
Cream Filling Techniques
The cream filling is the heart of your banana split cake. You want a smooth, rich mix that goes well with the fruit:
- Use room temperature cream cheese for easier mixing
- Whip cream until stiff peaks form
- Fold ingredients gently to maintain a light texture
- Chill the filling for at least 30 minutes before assembling
Flavor Enhancement Tips
Boost your banana dessert with these tips:
- Add vanilla extract for depth
- Sprinkle crushed nuts between layers
- Drizzle chocolate sauce for extra decadence
- Consider a splash of rum or amaretto for adult versions
By using these techniques, you’ll make a banana split cake that’s more than just a dessert. It’s a memorable experience that celebrates the classic banana split flavors.
Assembling Your Layered Banana Dessert

Making a layered cake is all about precision and patience. Your banana split dessert will come to life as you carefully stack its parts. Make sure each layer is cool before you start.
Here are the essential steps for a perfect layered cake:
- Place the first cake layer on a flat serving plate
- Spread a thin layer of cream filling evenly
- Add sliced fresh bananas across the cream layer
- Gently position the next cake layer
- Repeat layering process until all layers are stacked
For no-bake banana split desserts, chilling is key. Chill each layer for 15-20 minutes between additions to maintain structural integrity. This keeps your layers from sliding and ensures they look clean and professional.
Professional bakers suggest using a cake leveler or long serrated knife for even layers. Trim any uneven edges to make your cake look symmetrical and appealing.
Pro tip: Keep your layers consistent in thickness for the most visually appealing result.
Watch out for too much moisture. It can make your layers soggy. Drain fruit well and use a thin crumb coat to seal in moisture before decorating.
Decorating Tips for a Professional Look
To make your banana split cake look amazing, you need some creative decorating tricks. Whether it’s for a special event or a family get-together, making it look professional can take it to the next level.
Professional bakers know that how it looks is just as important as how it tastes. With the right decorating, your sundae cake can be a real showstopper.
Frosting Techniques
Learning how to frost your cake can make a big difference. Here are some pro tips:
- Smooth buttercream finish using an offset spatula
- Textured rosette piping for elegant edges
- Ombré color gradient effect
- Rustic naked cake style with partial frosting
Garnish Ideas
Make your summer dessert pop with creative garnishes that fit the banana split theme:
- Fresh fruit slices arranged strategically
- Chocolate drizzle
- Chopped nuts for texture
- Maraschino cherries
Presentation Styles
| Presentation Style | Best For | Visual Impact |
|---|---|---|
| Individual Mini Cakes | Dinner Parties | High |
| Large Sheet Cake | Family Gatherings | Medium |
| Layered Parfait Style | Elegant Events | Very High |
Pro tip: Always chill your cake before final decorations to ensure crisp, clean lines and prevent frosting from sliding.
“Great desserts are works of art that delight both the eyes and the palate.” – Professional Pastry Chef
Storage and Serving Guidelines

Keeping your frozen treat fresh is key. A no-bake cake needs special care to keep its taste and texture. Follow these tips to keep your banana split cake delicious.
Refrigeration is essential for your dessert’s freshness. Store it in an airtight container to avoid moisture loss. Wrap it with plastic wrap or foil to shield it.
- Refrigerate for up to 3-4 days at 40°F or below
- Keep away from strong-smelling foods
- Place in the middle shelf of the refrigerator
Before serving, let the cake sit out for 15-20 minutes. This softens it and enhances its taste. Use a clean knife for each slice, wiping it clean between cuts.
Freezing is great for longer storage. Wrap it in plastic wrap and foil. Pro tip: Use a freezer-safe container to avoid freezer burn.
- Freeze for up to 2-3 months
- Thaw overnight in the refrigerator
- Consume within 24 hours of thawing
Portion control makes your dessert even better. Use a sharp knife for clean slices. Serving sizes make it easy to enjoy. Your banana split cake will be a hit when stored and served right.
Troubleshooting Common Issues
Making the perfect banana split no bake recipe can be tricky. Even seasoned bakers face problems. This guide will help you solve common issues while preparing banana split desserts.
When baking your banana split cake, texture and storage issues might pop up. Knowing these problems will help you make a tasty dessert with ease.
Texture Rescue Strategies
Texture problems can ruin your banana split desserts. Here are quick fixes:
- Soggy crust: Apply a thin layer of cream cheese or chocolate before adding fruit
- Runny filling: Chill ingredients well and use stabilized whipped cream
- Browning bananas: Brush sliced bananas with lemon juice to keep them fresh
Smart Storage Solutions
Proper storage keeps your banana split no bake recipe delicious:
| Storage Method | Duration | Best Practices |
|---|---|---|
| Refrigerator | 2-3 days | Cover tightly with plastic wrap |
| Freezer | 1-2 weeks | Wrap in aluminum foil, store in airtight container |
Quick Fixes for Dessert Disasters
Even when things go wrong, you can fix your banana split cake:
- Crumbly base? Press mixture firmly into pan
- Overly soft filling? Freeze for 30 minutes before serving
- Uneven layers? Use a spatula to smooth and redistribute
Remember, practice makes perfect with banana split desserts!
Variations and Creative Twists
Your banana split cake can be a canvas for creativity. Try swapping traditional ingredients for new ones. A chocolate banana dessert adds richness, while a strawberry version brings color and tanginess.
Think about adding fruits like passion fruit or mango for a twist. Nuts like toasted pecans or macadamia nuts add crunch. Try sauces like salted caramel or dark chocolate ganache for unique flavors.
Using regional ingredients can lead to amazing variations. A tropical cake might have coconut and pineapple. A Mediterranean version could include pistachios and orange zest. Your creativity knows no bounds with this dessert.
Professional bakers suggest keeping the core of the cake while adding new twists. Stick to the layering method but use different ingredients. Your guests will love the mix of familiar and new flavors.
FAQ
How long does a banana split cake typically last in the refrigerator?
Your banana split cake will last 3-5 days in the fridge. For the best taste, eat it within 2-3 days. Fresh fruit toppings might get soft faster.
Can I make a banana split cake ahead of time?
Yes, you can make it 1-2 days early. Many find the flavors better after a short fridge time. Just add fresh toppings right before serving.
Is it possible to make a banana split cake gluten-free?
Yes, it’s easy to make gluten-free. Use gluten-free graham crackers and check all ingredients are gluten-free. Many brands offer gluten-free options.
Can I freeze a banana split cake?
Freeze it for 2-3 weeks. Wrap it in plastic and foil to avoid freezer burn. Fresh fruits might change texture when thawed. Add fresh toppings after thawing.
What are some creative variations I can try with this dessert?
Try different things like chocolate cake, strawberry or pineapple layers, or unique toppings. You can also make individual servings in glasses for fun.
How can I prevent my banana split cake from becoming too soggy?
Dry banana slices before layering, use cream cheese or pudding as a barrier, and chill the cake. For no-bake, pack the crust well and chill before adding layers.
Are there any dairy-free alternatives for making this cake?
Yes, use coconut whipped cream, dairy-free cream cheese, and non-dairy pudding mix. Coconut or almond milk can also be used.
What’s the best way to slice and serve this cake?
Use a knife dipped in hot water and wiped dry for clean slices. Chill the cake well before cutting. Wipe the knife clean after each slice for neat edges.
Did You Try Our Recipe?
There are no reviews yet. Be the first one to write one.